
|
Custom
3D Tools
Output
Scene as Map Export
Lightwave scenes to 3D Game System map and wad files Available
now for PC & Mac OSX. |
 |
||
 |
|
Tutorial by Dixon Franklin! - Make an evenly curved room and a complex hollow dome. (One Meg overall.)
|
||||
|
Export Complete
scenes from Layout to map file format. Breaks down LW
Geometry into valid blocks. Includes Load WAD plugin for
Layout AND Modeler to load an entire wad file into LW's image list so
you can apply them to surfaces. Output Scene as Map's main features: Exports Map file in 3DGS format. Includes lights with position, color and range. Textures defined by standard LW surfaces. Separate texture per polygon permitted. Breaks up complex LW geometry into game legal components.
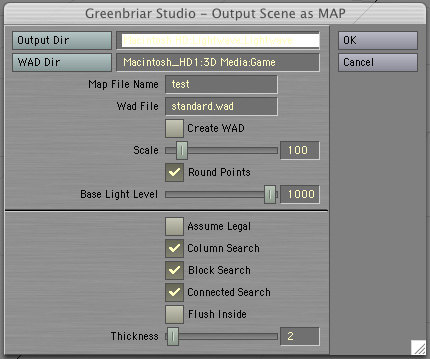
File Options - Output Dir - Where map file will be written WAD Dir - Where optional wad file will be written (so it will go directly to your wad directory) Map File Name - Name of output file - .map is added if not included with the name Create WAD - if selected a wad file of the textures applied to surfaces (not all textures in the image list) is created. Wad file - This is the wad file that is referenced in the map file. If you are creating a WAD file, this is also the name of the file to be created, .wad is added if not already part of the name. If you are not creating a wad file, this should be the name of the wad file you loaded into LW. Scale - A multiplier for converting LW's meters into quants. Scales textures and lights as well as geometry. Round Points - If selected all geometry references (including light locations) are rounded to the closest quant, to avoid the rounding errors that appear as gaps between blocks. Base Light Level
- Converts light intensity (0-100%) to 3DGS range. Set this to the largest
range you need and scale other lights to less than 100%.
Geometry Breakout Options - These options control how complex geometry is broken up. Objects, as referred to here are either separate LW objects, or layers of an object. If it shows up as an item in the object list, we treat it as a separate object. These controls allow you to control the amount of geometry created. The goal, of course, is to create the minimum geometry necessary. These can be turned on in any combination. Assume Legal - When on, this tells the engine that any object/layer with 32 faces or less is a legal object and to write it out as a single block. This lets you setup odd legal objects. When off, all objects pass to the breakout engine, if on, only objects/layers with more than 32 faces go to the breakout engine. Column Search - Breaks out columns. Searches for matching multi side faces connected by quad polygons. Handles columns and solid pipes. NOTE - requires faces at joints of pipes, otherwise you get a hollow pipe composed of double sided blocks (See flush inside). Block Search - Breaks out simple six sided blocks. This is the most used breakout function. Walls composed of sections created by extruding from lines, etc, create a set of hollow, no end cap box shapes. While it may actually be a single several hundred face mesh, it can be broken down into individual 6 sided blocks that are game BSP legal. End caps are not required for this function to work, just four connected quad faces. Connected Search - Searches for sets of faces that are connected by shared points within an object/layer. If a set is found with less than 32 faces, it is written out as a block. Handles 20 sided spheres, etc. This handles odd objects within a high poly count object/layer. Flush Inside - Flush inside tells the final breakout engine to flush blocks on the inside vs the outside. The final engine allows you to create otherwise illegal geometry by creating a block for each face. This can make hollow spheres or pipes that you can enter, shapes with holes in them, etc. Any faces not used by a previous breakout technique are generated as separate blocks by this code. It's like an igloo, thin slabs set edge to edge. Thickness - The thickness is the thickness in quants of the new block created by the face by face final geometry creator. The thickness direction is determined by the face's normal. Away from the normal (default) flushes the outside of the object. You can force an object to be created face by face just by turning the other switches off. As you can see, you may have a model that is mostly corridors, that are generated by Block Search, but a couple of special pieces that are created one face at a time, or as a single legal object by placing it in its own layer. The engine can not recognize all cases of illegal geometry. If something can not be genertaed with the rest of your model, save it by itself and then run it with all switches off and it will create a face by face version. Except for non-planar faces and faces with notches, this should always give valid output, but it is the highest geometry count, so it shouldn't be your default method. Load WAD to Image List: The only thing to note here is to put your Wad in a 'safe' folder. Disk files have to be created in order to load them into LW (you can't load directly from memory) so the wad is blown out to a set of tif files (no compression) in the same directory and then loaded into LW. This plugin comes with two versions in the same file, so you can install it in both Modeler and Layout. Texture Notes: The texture name given to each face comes from 1) the name of the texture file (minus extensin) that is applied to the color channel of the surface that the face is part of, 2) the name of the surface, if no texture map is applied or 3) #default if there is no surface or if the surface is named default. LW and 3DGS handle textures very differently. 3DGS textures are repeating and start from the origin, not your block. This makes it easy for sets of blocks with the same texture to be seamless, but makes it difficult to position a special texture. To make a special texture, use a single face surface, apply and scale the texture using planar projection (the map export picks up your texture position scale and rotation) and export. But expect to reset the position in Wed as Wed does NOT start the texture from the edge of your block. And if you move the block you'll notice that the texture slides around. Using lock texture will help this, but try to avoid moving the block afterwards as the texture will still shift, but more slowly. What this plugin does NOT do in the 1.0 release: Create terrain files, create MDL files. What the map file can not accept: Any single FACE that is concave. We can create concave OBJECTS, but a single face can not be concave - ie the edges must be straight and the edge can not have 'notches'. Any non-planar face. We will create a block where you have non-planar faces, but since all block sides are defined as planes, you will not see the twist that you had in the face, so one end or the other of the object will be changed.
LW to MAP Available now for PC and Max OSX! See order page under Game Tools. You can pay by Paypal
from our order page or by check by mail. Email to order: grnbriar@mindspring.com Scroll down for more examples.
|
|
|
||
 |
|
|
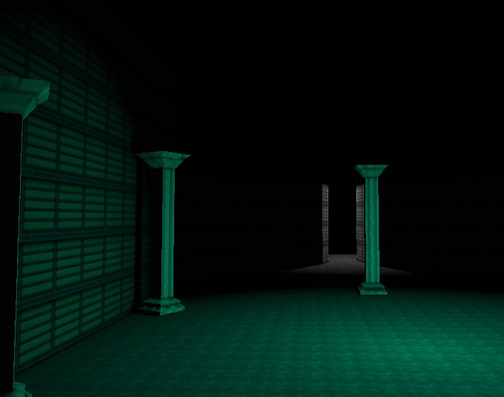
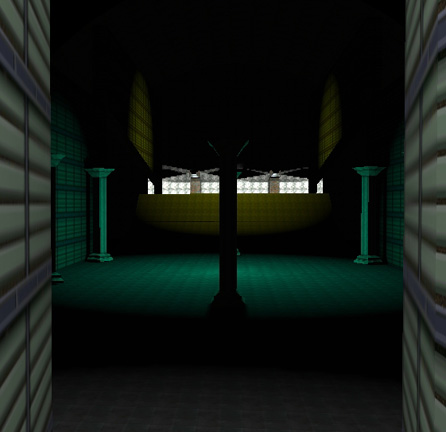
Game images generated with LW to map, including lights. |
 |
||
|
|
|
 |
||
|
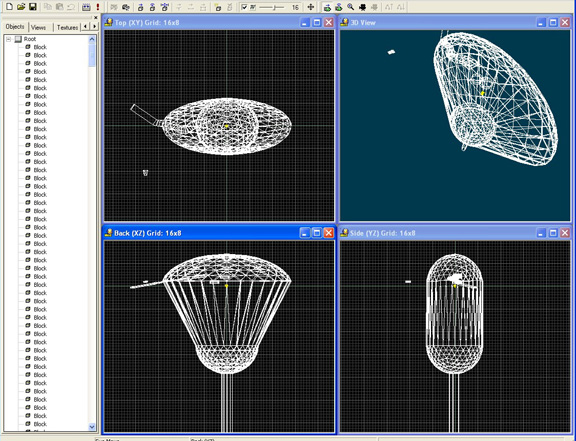
A good example of how complex you can get. This is a hollow shape, textured inside and out, with an entry tunnel, internal bridges and walkways. This has so much geometry I can't get it to compile on my machine, it runs out of memory. The geometry here is now being simplified so the game engine can handle it. So design is very important. You can easily create more geometry with an automated tool like this than a game engine can handle! |
|
|
|
|||
|
|